The space under your sink, whether in the kitchen or bathroom, is one of the most underrated (and most neglected) storage areas in the home. It’s out of sight, which means it’s often out of mind. Before you know it, the cabinet becomes a dark, jumbled mess of cleaning sprays, random sponges, backup toiletries, and products you didn’t even realise you had.
But here’s the thing: when it’s organised, this small space can be a powerhouse of functionality. With a little planning, the right tools, and a few clever tricks, you can turn your under-sink area into a neat, efficient storage zone where everything is easy to find.
Think of it this way: you open the doors and instantly spot the cleaning spray you need, the spare toothpaste is right where it should be, and your rubbish bags aren’t squashed in the back corner anymore. It’s a simple change that can make everyday routines smoother and less stressful.
In this guide, we’ll break down exactly how to organise under the sink in both your kitchen and bathroom, step-by-step, so you can reclaim this valuable space and keep it that way.

Why Organising Under the Sink Matters

Image source: Blissfull Little Home
It’s tempting to leave this space messy, after all, the doors hide it. But organising it pays off in multiple ways:
- Saves time – You’ll know exactly where your products are, so you’re not digging around in frustration.
- Maximises storage – Clever solutions can create more usable space, even around tricky plumbing.
- Prevents waste – No more buying duplicate cleaning sprays or extra toothpaste because you couldn’t find the one you already had.
- Keeps your home safer – Hazardous products can be stored securely, away from pets or children.
- Makes cleaning easier – When products are organised, cleaning the space itself takes minutes.
👉 Think of it this way: every time you open those cabinet doors, you’re either met with a sigh of relief or a sigh of stress. A little bit of organisation can completely change how you feel about tackling daily household chores.
Step 1: Clear It All Out
Before you can organise, you need a blank slate.
What to do:
- Remove everything from the cabinet, even items you think you’ll keep.
- Place them on a towel or drop cloth so you can see what you’ve got.
- Check the base of the cabinet for leaks, water damage, or mould.
- Wipe the interior clean with an all-purpose spray before moving to the next step.
Pro Tip: If you find any leaks, fix them before you organise, there’s nothing worse than setting up a perfect system only for water to damage it.
Step 2: Declutter and Sort
Under-sink areas often become the “miscellaneous” zone. Now’s your chance to set some boundaries on what belongs here.
Kitchen categories might include:

Image source: Little Label Co
- Dishwashing supplies (sponges, scrubbers, dish soap)
- Cleaning sprays and disinfectants
- Rubbish bags and recycling bags
- Gloves and cleaning cloths
Bathroom categories might include:

Image source: Blissfull Little Home
- Toilet paper and tissues
- Bathroom cleaning products
- Hair tools (dryer, straightener)
- Back-up toiletries and personal care items
Decluttering tips:
- Toss expired products – Cleaning products lose effectiveness over time.
- Combine duplicates – If you have two half-empty bottles of the same thing, pour one into the other.
- Donate unopened items – If you won’t use it, pass it on to someone who will.
👉 The goal here is to be realistic. Just because it “fits” under the sink doesn’t mean it belongs there. Choose only what you use regularly and keep the rest elsewhere.
Step 3: Measure Your Space
The under-sink area is rarely straightforward, plumbing pipes, water filters, and awkward heights can make it tricky to fit storage.
Why measure first:
- Prevents buying organisers that don’t fit.
- Helps you choose adjustable or customised options.
- Allows you to plan zones for different categories.
Key measurements to take:
- Height from base to the underside of the sink
- Depth from the door to the back wall
- Width from side to side
- Distance between any pipes
👉 Taking five minutes to measure can save you from the frustration of buying bins or shelves that don’t work. It also helps you picture how to use every inch of available space.
Step 4: Choose the Right Storage Solutions

Image source: Blissfull Little Home
Once you know your measurements, you can pick the best organisers for your space.
Kitchen Under-the-Sink Ideas:
- Pull-out drawers – Ideal for deep cabinets; bring items to you instead of reaching in.
- Tiered shelving – Maximises vertical space without blocking access.
- Lazy Susans – Perfect for bottles; just spin to grab what you need.
- Tension rods – Hang spray bottles by the trigger to free up shelf space.
- Slim bins – For rubbish or compost bags, keeping them upright and contained.
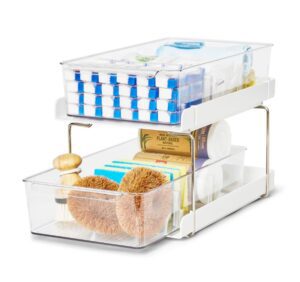
Image source: Blissfull Little Home
Bathroom Under-the-Sink Ideas:

Image source: IKEA
- Stackable bins – Store toilet paper in one, extra shampoo in another.
- Clear labelled containers – See exactly what’s inside without rummaging.
- Over-the-door organisers – Perfect for hairdryers or brushes.
- Drawer organisers – Small trays for cotton buds, toothpaste, and smaller toiletries.
- Turntables – For skincare bottles or cleaning sprays in awkward corners.
👉 Remember: storage should work for you. If you prefer quick access, opt for open bins. If you want it to look sleek and minimal, go for matching closed containers.
Step 5: Contain and Label Everything

Image source: Little Label Co
Grouping similar items into containers keeps the space visually tidy and easier to maintain.
Label benefits:
- Makes it easier for everyone in the household to put things back.
- Helps you stick to your system over time.
- Looks aesthetically pleasing, especially in clear bins.
💡 Pro Tip: Use waterproof labels or a label maker to avoid peeling in damp conditions.
Step 6: Maintain the System

Image source: Little Label Co
Organisation is only as good as your habits. Make it a routine to keep this area tidy.
Maintenance tips:
- Once a month, do a quick reset — toss empties, combine duplicates, wipe the base.
- Stick to “one in, one out” — don’t add a new product without removing an old one.
- Keep frequently used items at the front and rarely used ones at the back.
👉 This way, your under-sink space won’t just look organised on day one, it’ll stay that way long term. A system is successful not because it’s perfectly styled for photos, but because it works for your household day in and day out.
Extra Hacks for Under-the-Sink Spaces

Image source: IKEA
- Line the bottom with a waterproof mat to protect against leaks.
- Hang hooks or clips on the inside of the cabinet doors for gloves or cloths.
- Use vertical storage to keep large items upright and free up floor space.
- Childproof locks are essential if storing chemicals in homes with young children.
👉 These little hacks can be the difference between a space that feels awkward and one that feels thoughtfully designed.
The under-sink area might seem small and insignificant, but when it’s well organised, it becomes a game-changer for your daily routines. From finding your cleaning products in seconds to keeping toiletries neatly stored, a functional under-sink space saves time, money, and frustration.
If you’re ready to transform not just your under-sink space but every corner of your home, Ducks in a Row Home Organisation can help. We create personalised systems that are beautiful, practical, and easy to maintain, even in the trickiest spaces.